

Are Ceramic Nail Drill Bits Safe for Beginners Practicing on Their Own Natural Nails at Home
2026-07-03
If you have ever watched a nail tutorial and wondered whether you could replicate that flawless finish at home, you have likely come across ceramic nail drill bits. The short answer is yes—ceramic nail drill bits are generally safe for beginners working on natural nails, but only when used with the right technique, speed, and grit selection. As a brand dedicated to home-nail-care safety, Ruina emphasizes that the tool itself is neutral; safety comes from education and practice. This guide walks you through everything a beginner needs to know, backed by professional principles and real-world testing.
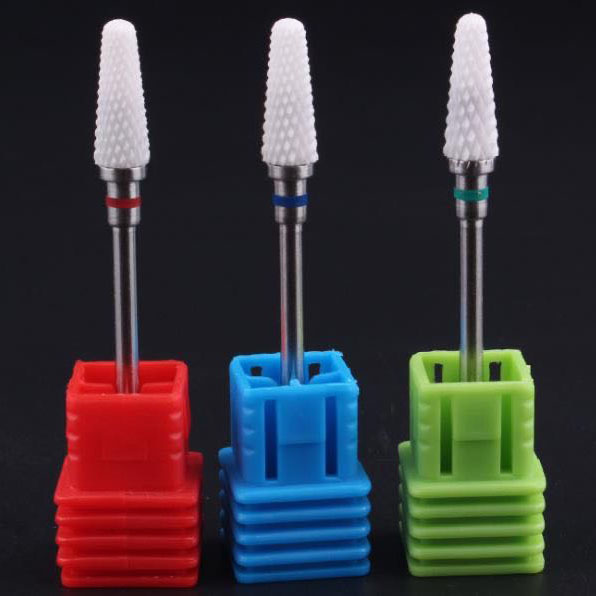
Why Ceramic Over Carbide or Diamond?
For natural nails, ceramic bits offer distinct advantages over metal or diamond-coated counterparts. The table below breaks down the key differences:
| Feature | Ceramic Bits | Carbide Bits | Diamond Bits |
|---|---|---|---|
| Heat generation | Low (heat-dissipating material) | High | Medium |
| Risk to natural nails | Minimal when used correctly | Moderate to high | Low to moderate |
| Best for | Buffing, cuticle care, fine shaping | Acrylic/gel removal | Thick product removal |
| Beginner-friendliness | High | Low | Medium |
| Cost | Mid-range | Mid-range | High |
Ruina recommends ceramic as the starter choice because the material stays cooler, reducing the burning sensation that often scares new users.
Essential Safety Rules for Beginners
Before you plug in your e-file, memorize these Ceramic Nail Drill Bits Tips For Natural Nails:
-
Start at the lowest RPM (5,000–8,000) – Never exceed 10,000 RPM on natural nails.
-
Use a light feather touch – Let the bit do the work; pressing hard causes grooves.
-
Keep the bit moving – Stationary contact creates heat and friction damage.
-
Match grit to purpose – Fine grit (180–240) for surface work; medium (150) for cuticles.
Step-by-Step Beginner Routine with Ruina Bits
| Step | Action | Recommended Ruina Bit | Speed Setting |
|---|---|---|---|
| 1 | Cuticle cleaning | Ruina Fine Cone (180 grit) | 6,000 RPM |
| 2 | Surface smoothing | Ruina Barrel Medium (150 grit) | 7,000 RPM |
| 3 | Shine/buffing | Ruina Polishing Cylinder (240 grit) | 5,000 RPM |
| 4 | Edge shaping | Ruina Tapered Fine (180 grit) | 6,500 RPM |
This sequence, when followed weekly, maintains natural nails without thinning the nail plate.
Common Mistakes and How to Avoid Them
Beginners often worry about over-filing. The rule is: if you see dust, you are removing material; if you see white powder, you are buffing. With Ruina ceramic bits, the audible feedback changes—a higher-pitched sound means you are safe; a lower grind means you are cutting too deep. Always check the nail plate thickness under natural light before and after each pass.
Ceramic Nail Drill Bits Tips For Natural Nails – FAQ
Q1: Can ceramic nail drill bits cause permanent thinning of natural nails over time?
A: Yes, if misused. However, with ceramic nail drill bits, the risk is significantly lower than with carbide because ceramic is less aggressive. To avoid thinning, restrict e-file use to once every 7–10 days, limit each session to 2 passes per nail, and always finish with a fine-grit (220+) buffing pass. Ruina recommends measuring your nail thickness with a digital caliper monthly—anything below 0.3 mm at the center means you should switch to hand filing for 4 weeks. Also, never use a ceramic bit on wet or soaked nails, as softened keratin shreds more easily.
Q2: What is the ideal grit progression for a complete natural-nail refresh using ceramic bits?
A: For a full routine, use a three-grit system: 150 grit (medium) for shaping the free edge and removing superficial ridges—limit to 3 seconds per nail. Then 180 grit (fine) for cuticle area cleanup and side-wall smoothing—move in a C-curve motion, 2 seconds per side. Finally 240 grit (ultra-fine) for natural shine and surface-level scratch removal—this can be done for up to 5 seconds per nail. Ruina color-codes its bits: red for coarse, blue for medium, gold for fine, so you never confuse them. Never skip grits; jumping from 150 to 240 leaves microscopic scratches that weaken the nail over time.
Q3: How do I clean and store ceramic bits to keep them safe for natural nails?
A: Ceramic is porous at a microscopic level, so bacteria can accumulate. After each use, scrub the bit with a soft nail brush and 70% isopropyl alcohol—never acetone, as it degrades the ceramic binder. Then air-dry completely before storing in a sealed container with silica gel packets. Ruina offers a dedicated storage case with individual slots to prevent bits from clinking together, which can chip the coating. Replace your ceramic bits every 6–8 months for home use, or immediately if you see any dark spots or rough patches—those indicate micro-cracks that will scratch natural nails unpredictably.
When to Stop and Seek Professional Help
If you experience any sharp pain, visible bleeding, or a burning odor, stop immediately. These signs mean you have gone past the natural nail into the living tissue. Ruina advises all home beginners to practice on a practice finger (latex or silicone) for at least 3 full sessions before touching their own nails.
Final Verdict: Safe, But Not Foolproof
Ceramic nail drill bits are absolutely safe for beginners—provided you respect speed limits, grit matching, and session duration. They are gentler, cooler, and more forgiving than metal alternatives. With Ruina bits, you also get color-coded guidance and a beginner-friendly RPM chart printed on every package. The real risk is not the bit—it is overconfidence. Start slow, check your work after each nail, and never rush.
Ready to start your safe home manicure journey? Contact Ruina today for a free beginner’s speed-and-grit reference card with every purchase. Our team of nail technicians answers all your Ceramic Nail Drill Bits Tips For Natural Nails questions within 24 hours.